A video guide to using the virtual classroom:
Frequently Asked Questions
We recommend that you use Google Chrome. We have had issues with Firefox and Microsoft Edge as some delegates have not been able to see the slides.
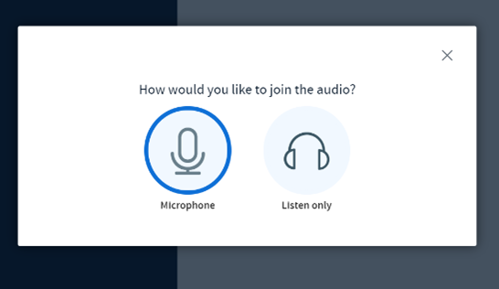
When logging in, please select the microphone option. Please ensure you have access to a microphone – this is now a function inbuilt in most devices / laptops. Your computer may ask you for permission to allow the virtual classroom to access your microphone.
Please use a laptop or tablet. Smartphones can be used but functionality will be limited. You may not experience the true value of the virtual classroom.
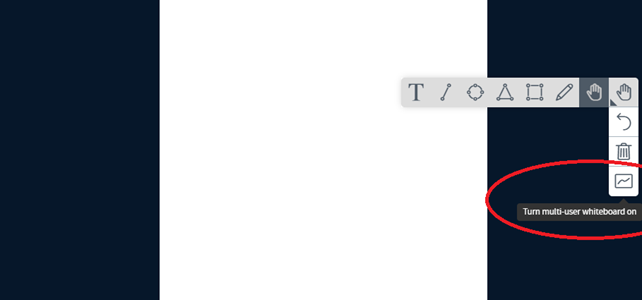
Please find below a list of annotation tools you will have access to. The ‘T’ is a text tool and you will be required to click on the screen and drag to create a box, you can then immediately write text. Other tools that will be relevant to you will be the line, circle, square and pencil tool. The ‘undo’ arrow allows you to remove the last item you annotated. The delete icon allows you to delete all annotations you have created.

Please contact your workshop supporter via the phone number you were sent prior to the workshop.
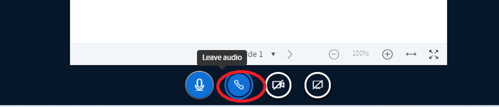
You may need to log out and log back in again, selecting the microphone option when you re-join. Alternatively you should have an audio option at the bottom of your screen to select. This will allow you to re-join via microphone.
Please remove one of your devices.
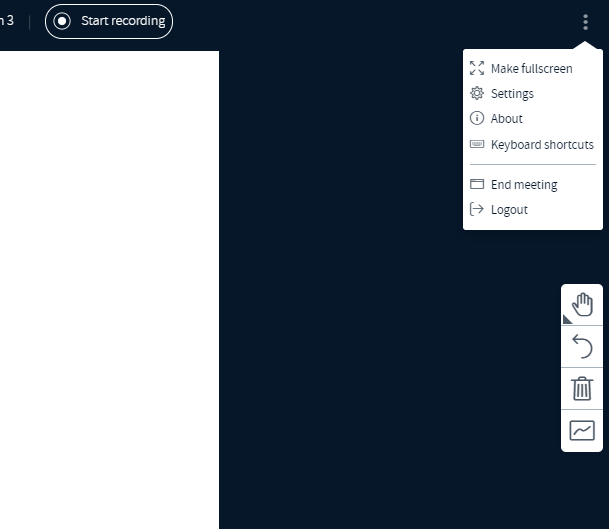
Please click on the three dots at the top of the page and click on ‘make full screen’.
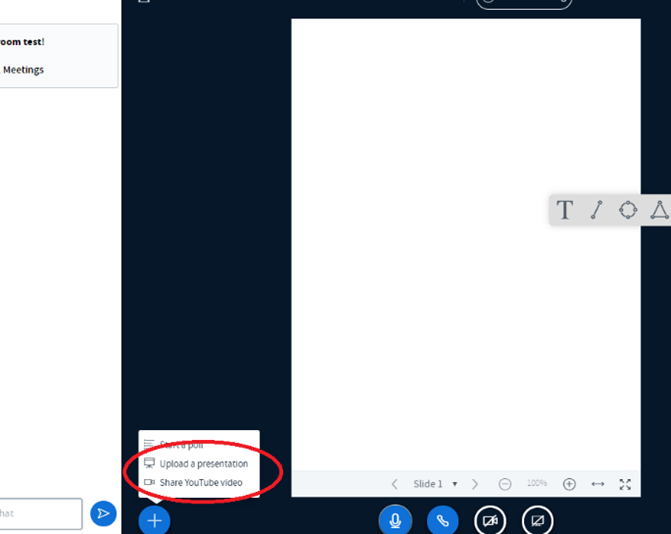
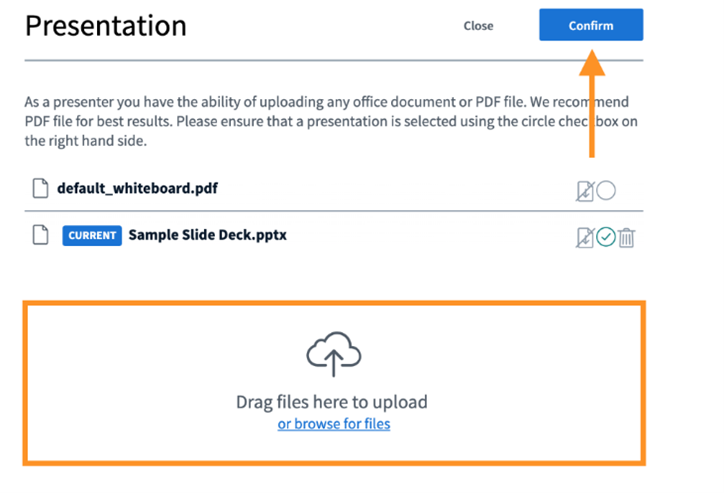
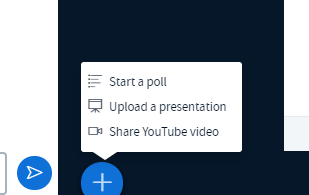
You will need presenter rights to do this. Click on the blue button and select upload presentation. Ideally the presentation should be in PDF format prior to upload.
Please follow the above steps – click on upload presentation and chose default whiteboard. You can move between the two formats using the classroom. If you are using a presentation and then select whiteboard, when you return to the presentation, it will go back to your previously viewed slide.
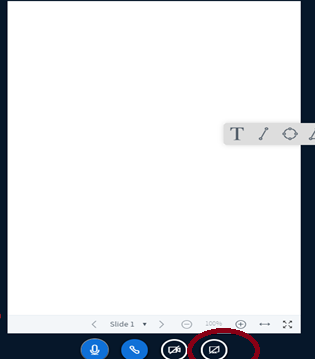
Please note, if you share your screen, the annotation tools will not work. If you would like to share a YouTube link, please click the actions button and select YouTube. Alternatively, you can share your screen if the video is on your laptop.
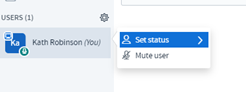
Click on the user and it will give you the option to ‘mute’.
Please click the whiteboard icon. To turn off a delegate’s access click the "Turn-Multi Users Whiteboard On" on the right sidebar. Please turn this off when annotation is no longer required.
You will need to be given moderator rights.
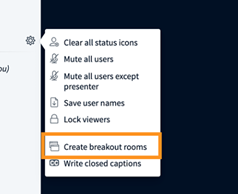
Click the ‘settings’ icon near the usernames > select Create Breakout Rooms.
You can manually or randomly assign the users to rooms, as well as define the number of rooms and duration the room is open (please use backspace to remove the existing duration and create a new duration in minutes). The minimum duration is 1 minute. Click Create.

The delegate will be presented with a prompt to Join the Room. They should select this. Please ensure when delegates return to the main room, they select join via microphone, not listen only.
The tutor will be able to see which room they have been assigned to as an icon will appear by their name, i.e. 1, 2 etc.
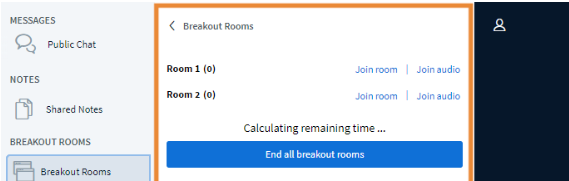
Click on Breakout Rooms in the left navigation > You can join the room (audio and video) or just join the audio. You also have the ability to end the breakout rooms which brings all users back to the Virtual Classroom.
Once they are back into the main room, click on their name and invite them back into the room they were allocated to. Alternatively, please add them as a moderator so they can join the room they were in.
Delegates can use the shared notes to write feedback discussed in the breakout rooms. They must copy the notes they have made as these will be lost on return to the main room. The tutor can ask for feedback from each room, allowing the delegates to paste their notes in the shared notes section when they are providing feedback.
To create a poll, you must have presenter rights. Click on the actions button below:
Please be aware you must verbalise your question. The poll function does not give you an ability to write the question. You will be presented with pre-determined answers such as true/false etc. This can be seen below..
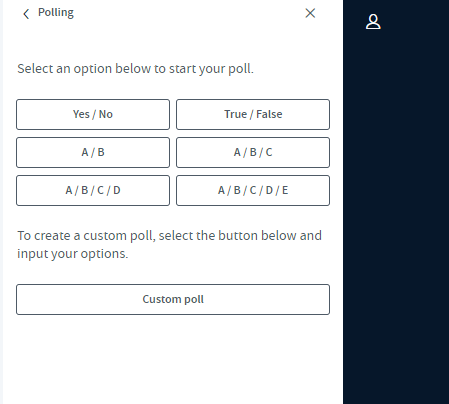
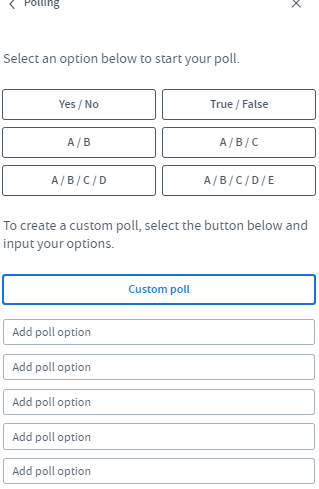
You can also populate your own answers by selecting the ‘custom poll’ option.
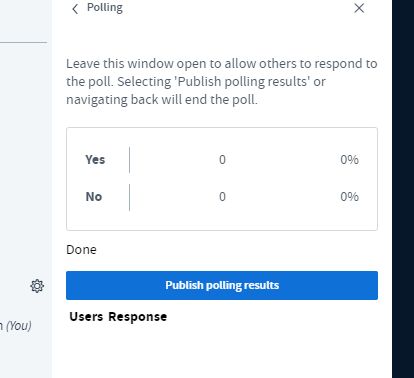
Once you submit the poll, the options will appear on the bottom right on the slide or whiteboard (whichever you are using at the time)
Please be aware you cannot pre-populate the poll in advance of the workshop.
Once you submit your poll, you will be presented with a screen which shows you which delegates have responded to the poll and what option they have chosen. Please be aware that the supporter will not contribute to the poll. Once you have received all responses, you can publish the results by selecting the ‘publish polling results’ option. This will also appear on the bottom right of the screen. Once you have published the results, you can select the recycle bin icon. This will delete the published results from the screen.
We would strongly recommend that the tutor has their video on throughout the workshop to allow the learner to lip read. We will also send the learner a copy of the slides in advance of the workshop.
When you are in the virtual classroom, you click on the little gear next to where the attendees names are. A little box will come up and the last option is the captioning one:

When connected to the Virtual Classroom and encountering audio issues, check to make sure the headset you are using is the selected microphone in your browser. In Chrome for example:
Click the Camera icon next to the bookmark star:
Make sure the microphone you are using is the correct microphone:
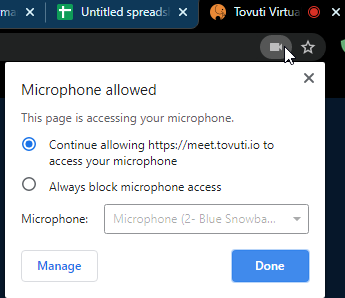
If not, select 'Manage' and select the correct microphone for use:
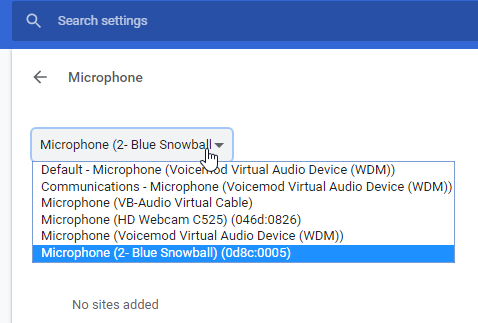
Logging out of the meeting and logging back in may be necessary to reflect these changes.